When I created this blog, I wanted to have a separate page for tutorial posts - and there is a page for that. However, I didn't realize that you couldn't actually make individual posts for each video tutorial, so I think I'm going to change things up a little by making the tutorial page sort of a "favorite video tutorials" page. And then I will just post the tutorials in the blog, along with products used, anything special about the process that isn't in the tutorial, and just a little written banter on each video post. This way, anyone who refers to my blog after watching the tutorials can check on any further information that may be available if they want to!
Thanks so much for visiting my blog, and truly it's such a pleasure to be able to talk about something that gives me so much joy (makeup) and share it with other people who feel the same way. xo, Isabelle
Monday, November 29, 2010

Saturday, November 13, 2010
The Art of Makeup Brushes and the Asian Eye
Perfectly Pink Bullet Crease Brush:
Oooooh boy... When I started this journey a few months ago to really learn about the craft and artistry of makeup, I really had no idea how deep the journey goes. Like any other art or craft, the more time and energy one gives to learning, the more one learns how much more there is to learn. The best makeup artists, in my opinion, are the ones that - even at the pinnacle of their craft at the commercial (market) level, they are constantly seeking and striving to stretch themselves as artists. Meaning - they are not satisfied with just fulfilling the quota of how societal standards require makeup application to be - in fact, they tend to chafe when they keep doing the same standard looks over and over again, even though they are masters at that craft. Instead, they continue to experiment with color, light, texture, and all the tactile functions which cause makeup to really come alive. Samantha, of the Pixiwoo sisters on Youtube, frequently mentions that if she didn't do a tutorial now and again for the pure pleasure of creating, she would "go mad." And I think that this is true of any creative personality.
At this point in my journey, I am still seeking to master the techniques that are currently being used. I have invested into makeup, more than any other products - including clothing, shoes(!), handbags, accessories, and all those other fun girly things that I love. I have (as previously mentioned) even gone so far as to sell couture handbags on ebay so that I could purchase more makeup. I don't even want to really think about how much I have invested into this passion in the last several months, but I am happy about every purchase and don't regret not building on my wardrobe at all this year. One of the products that I have been purchasing on a mass level are makeup brushes. I have both Sigma basic and premium brush kits (which mostly dupe MAC brushes - and pretty well, from what I have heard, otherwise I wouldn't have purchased them), as well as various sundry brushes from Sephora, Crown brushes, Nyx, and various other companies through which I have made purchases.
I am sure that as I continue to learn about brushes, I will continue to discover more uses for them. However, this post is about a few breakthroughs in understanding which have happened gradually - and then with a current purchase from Crown brush of a bullet point crease brush, a whole word opened up to me which was heretofore closed.
I would like to talk, in particular, about crease brushes and how to use them appropriately for an Asian eye. Because those of us with smaller eyes, less deeply set than our sisters of different races (excluding Southern and Southeast Asia, in which one sees more deeply set eyes in Indian, Middle-Eastern, Philippino and certain other nationalities), if you have ever taken a blending brush and put it gently to your carefully applied eye makeup, only to watch it blend away into a muddy mess - you know what I'm talking about. It is only in the last couple of days that I finally made a breakthrough that I believe is taking me to a different level (finally!) in makeup application.
Let's discuss the Sigma E45, which is a tapered blending brush. I bought this brush specifically because it has a pointed tip and a round body. I thought that the tip would help me blend areas that I was unable to easily blend before. Well, the thought was correct, but my lack of technique made this brush pretty much useless for me. I didn't realize until I just received the bullet point brush from Crown brushes (see top pic) that the way to use these brushes is to insert the tip into the "crease" - which, for Asian eyes, actually means the eye socket. When you sink the brush into the socket, it then easily shades and blends colors to perfection. And re-watching some 'Makeup by Ren-Ren' tutorials today, I realized that you can really use a large variety of blending blushes as long as you know where to place the brush. And again, the place to put it is to sink it right into the socket.
It finally clicked for me when I used that bullet point brush: the small point sinks easily into the socket, and any color is easily deposited by the tip and blended out by the rounder body of the brush. And then it all came together: the E45 is meant to pick up a very small amount of color on the tip of the brush, and the fluffy body then distrubutes the color evenly throughout the surface of the eye. This morning I tested this theory by using a light brown shade, and it worked perfectly. The E45 blended the color into the perfect shape above the crease, and then using the bullet brush, I was able to add darker browns and then a little bit of black into the outer eye corner. Then using the E45 again, I blended out the colors to get just the right amount of smokiness into the outer corner of the eye. A shimmery light beige tone on the inner corner and on the lid created a textbook smokey eye. Eureka!
If you're Asian with a small lid and hooded or no crease, that's the trick to blending out a smokey eye. Don't be afraid to push down onto the eye with the brush. In the beginning, I was really afraid of blending out colors because I thought I would lose the vividness of the tone, so I tried to blend really lightly. There are times when you need to use less pressure, but for the first mid-tone, used as a background for the look, go ahead and dig into the socket with the tip of the brush and blend away! The bigger the brush, the larger the area that it will blend out. The bullet point brush, for instance, is a small rounded brush with a sharp tip. This is perfect for adding dimension to the mid-tone color by using deeper colors on top of it.
Ok, I'm not going to talk about it anymore, because at some point, I think you just need to see it and really register what's happening. I'm going to create a tutorial soon which shows this process.... but for now, I am just excited to share the knowledge. I was re-watching some of my older videos, and was painfully struck by how tedious it was for me to blend out colors - and that is because I didn't know how to use the crease (socket) to ground the brush and blend the colors out. I think this is going to change how I do my eye makeup in the best possible way - and if you are a beginner at makeup application and have been stumped about how to blend out the colors using your brushes on your Asian crease-less eye, keep an eye out for the next few videos as I plan on creating a video that will specifically point out this process.

Oooooh boy... When I started this journey a few months ago to really learn about the craft and artistry of makeup, I really had no idea how deep the journey goes. Like any other art or craft, the more time and energy one gives to learning, the more one learns how much more there is to learn. The best makeup artists, in my opinion, are the ones that - even at the pinnacle of their craft at the commercial (market) level, they are constantly seeking and striving to stretch themselves as artists. Meaning - they are not satisfied with just fulfilling the quota of how societal standards require makeup application to be - in fact, they tend to chafe when they keep doing the same standard looks over and over again, even though they are masters at that craft. Instead, they continue to experiment with color, light, texture, and all the tactile functions which cause makeup to really come alive. Samantha, of the Pixiwoo sisters on Youtube, frequently mentions that if she didn't do a tutorial now and again for the pure pleasure of creating, she would "go mad." And I think that this is true of any creative personality.
At this point in my journey, I am still seeking to master the techniques that are currently being used. I have invested into makeup, more than any other products - including clothing, shoes(!), handbags, accessories, and all those other fun girly things that I love. I have (as previously mentioned) even gone so far as to sell couture handbags on ebay so that I could purchase more makeup. I don't even want to really think about how much I have invested into this passion in the last several months, but I am happy about every purchase and don't regret not building on my wardrobe at all this year. One of the products that I have been purchasing on a mass level are makeup brushes. I have both Sigma basic and premium brush kits (which mostly dupe MAC brushes - and pretty well, from what I have heard, otherwise I wouldn't have purchased them), as well as various sundry brushes from Sephora, Crown brushes, Nyx, and various other companies through which I have made purchases.
I am sure that as I continue to learn about brushes, I will continue to discover more uses for them. However, this post is about a few breakthroughs in understanding which have happened gradually - and then with a current purchase from Crown brush of a bullet point crease brush, a whole word opened up to me which was heretofore closed.
I would like to talk, in particular, about crease brushes and how to use them appropriately for an Asian eye. Because those of us with smaller eyes, less deeply set than our sisters of different races (excluding Southern and Southeast Asia, in which one sees more deeply set eyes in Indian, Middle-Eastern, Philippino and certain other nationalities), if you have ever taken a blending brush and put it gently to your carefully applied eye makeup, only to watch it blend away into a muddy mess - you know what I'm talking about. It is only in the last couple of days that I finally made a breakthrough that I believe is taking me to a different level (finally!) in makeup application.
Let's discuss the Sigma E45, which is a tapered blending brush. I bought this brush specifically because it has a pointed tip and a round body. I thought that the tip would help me blend areas that I was unable to easily blend before. Well, the thought was correct, but my lack of technique made this brush pretty much useless for me. I didn't realize until I just received the bullet point brush from Crown brushes (see top pic) that the way to use these brushes is to insert the tip into the "crease" - which, for Asian eyes, actually means the eye socket. When you sink the brush into the socket, it then easily shades and blends colors to perfection. And re-watching some 'Makeup by Ren-Ren' tutorials today, I realized that you can really use a large variety of blending blushes as long as you know where to place the brush. And again, the place to put it is to sink it right into the socket.
It finally clicked for me when I used that bullet point brush: the small point sinks easily into the socket, and any color is easily deposited by the tip and blended out by the rounder body of the brush. And then it all came together: the E45 is meant to pick up a very small amount of color on the tip of the brush, and the fluffy body then distrubutes the color evenly throughout the surface of the eye. This morning I tested this theory by using a light brown shade, and it worked perfectly. The E45 blended the color into the perfect shape above the crease, and then using the bullet brush, I was able to add darker browns and then a little bit of black into the outer eye corner. Then using the E45 again, I blended out the colors to get just the right amount of smokiness into the outer corner of the eye. A shimmery light beige tone on the inner corner and on the lid created a textbook smokey eye. Eureka!
If you're Asian with a small lid and hooded or no crease, that's the trick to blending out a smokey eye. Don't be afraid to push down onto the eye with the brush. In the beginning, I was really afraid of blending out colors because I thought I would lose the vividness of the tone, so I tried to blend really lightly. There are times when you need to use less pressure, but for the first mid-tone, used as a background for the look, go ahead and dig into the socket with the tip of the brush and blend away! The bigger the brush, the larger the area that it will blend out. The bullet point brush, for instance, is a small rounded brush with a sharp tip. This is perfect for adding dimension to the mid-tone color by using deeper colors on top of it.
Ok, I'm not going to talk about it anymore, because at some point, I think you just need to see it and really register what's happening. I'm going to create a tutorial soon which shows this process.... but for now, I am just excited to share the knowledge. I was re-watching some of my older videos, and was painfully struck by how tedious it was for me to blend out colors - and that is because I didn't know how to use the crease (socket) to ground the brush and blend the colors out. I think this is going to change how I do my eye makeup in the best possible way - and if you are a beginner at makeup application and have been stumped about how to blend out the colors using your brushes on your Asian crease-less eye, keep an eye out for the next few videos as I plan on creating a video that will specifically point out this process.
Friday, November 12, 2010
The inverted smokey eye II

This is another version of the smokey eye. I wanted to do a comprehensive review of the Lorac croc train case holiday palette, so almost all the products used in this look were from that palette. Interestingly, the color I used in the middle of the eye, the bright blue (which is my favorite color of the entire 36 color palette - by Far!), is quite similar to the color I used from the Sleek palette for the original look. The main difference was the shimmer, which was in the Sleek palette color. However, this matte color pops more despite the fact that it is matte... maybe because it's matte. I'm not sure. I only know that it pops much more as you can see in the picture here. I was going to do a tutorial on this look, but frankly I got lazy, lol...
However, I would like to do some more looks using the Lorac holiday palette so that I can give a more well-rounded review of the set. As I mentioned in another post, the Tarte palette that I purchased last year has gotten very little use because I discovered that the shadows are quite powdery and have a tendency to lose the vibrancy of the colors. So far, the Lorac palette is showing itself to be superior by far, but I will continue to test the palette with different looks to see how the quality of the shadows hold up overall.
However, I would like to do some more looks using the Lorac holiday palette so that I can give a more well-rounded review of the set. As I mentioned in another post, the Tarte palette that I purchased last year has gotten very little use because I discovered that the shadows are quite powdery and have a tendency to lose the vibrancy of the colors. So far, the Lorac palette is showing itself to be superior by far, but I will continue to test the palette with different looks to see how the quality of the shadows hold up overall.
Friday, November 5, 2010
The Inverted Smokey Eye
 This past week, my son has been sick which means that I have been running back and forth to the doctor's and to his school. Because I have fibro-myalgia/chronic fatigue, I get really exhausted and oftentimes, I can only pick a few things to do on any given day. With the extra running around for my son, I have found myself unable to do the things I need to do to take care of myself because I've been too tired to scrape up the energy. On the upside (silver lining to every cloud, right?) I have had a lot of time to sit in front of the computer and scour youtube.
So I found a tutorial by Julieg317 (love her makeup looks) called 'Purple Rockstar Eyes,' http://www.youtube.com/user/julieg713#p/u/54/XRmOCbaqy2s, which is basically an inverted purple smokey eye. I absolutely love Julie's eyes but sometimes, I just don't know if her looks will work out on my eye, being as that my eyes are much flatter and smaller than Julie's. Her eyes are deep-set, which gives all of her multi-dimensional looks even more depth. On my eyes, I have to fake depth or in this case, pretty much skip it. However, I still wanted to try this technique, so I used my Sleek palettes (these are amazing - the colors are soooo silky and pigmented... the only thing about them is that one worries about the colors breaking because the texture seems so soft. But at 10.00 for a 12-shadow palette, there's really not much room to complain. There is a steeper shipping charge, as these are made in the U.K., but frankly it's worth it, especially if you're able to purchase several palettes at once...) I found a really brilliant blue color as the inner focal-point, and experimented with different darker shades of blue to create the inverted smokey effect.
While I was playing around with products, I used my new Nyx crystal glitter liners in blue and black underneath the eye - and was astounded by the beautiful effect. I purchased these on ebay recently when I went to purchase a few more of the candy glitter liners and saw that there were these new crystal glitter liners - so I purchased 3 of them. But I didn't have a chance to try them until today, and I have to say - these liners are amazing. They are unlinke any other glitter liners that I own, and create an unusually pigmented, sparkly and very fine line. Gorgeous.
I also have a buxom lash liner in 'blue velvet,' which is a truly dazzling blue gel/cream liner with glitter particles. I used this on both upper and lower waterlines, and when all was said and done, I really loved the look. I think I'll try and do a tutorial on this look in the next couple of days. It's definitely not a look for the faint of heart (or for those with very close-set eyes.... the inverted smokey eye pulls the eyes inwards where they usually get pulled outward into a cat-eye effect), but the gorgeous colors and just a touch of glitter in the lower lid and the waterlines is really quite beautiful, I think. It's a bit goth-looking, but I could also easily envision this look on the runways. It's a very edgy, interesting effect, suitable perhaps for a club-night, or just for the individual who likes being an individual, unapologetically and unabashedly... and hey- that works for me :)
What a Difference a Year Makes! Holiday Goodies, from 2009-2010
 There's definitely something about the holiday season for make-up lovers that mimics the pure giddiness of a child's love of the holidays. High end brands come out with products loaded with value (and fun) and you get to sample some of the most talked-about products and companies at rates that are almost affordable for the average human being (meaning that you do struggle with bills and your foremost struggles don't have anything to do with deciding between a tropical trip to Fiji or a shopping trip to Dubai). Not that I'm knocking the status of a financial tycoon... it's just not something that most of us deal with, other than our weekly dose of "The Real Housewives of Beverly Hills."
Last year began what had always been a pretty strong obsession with beauty/makeup products (helped by the local opening of Sephora to my local city). I was doing a very irregular shopping trip to the mall (usually my budget dictates that I stick to my local Ross, dress-for-less, and frankly, I have to curb my appetites even there). Strolling down the aisles of Sephora, I just happened to stop by in time for the holiday palettes. So I was happily sampling different palettes, comparing product quality, presentation, and sizes, and I finally ended up purchasing the Tarte holiday 2009 palette. I was ecstatic with my purchase, and wanted to purchase the same palette for one of my close friends. However, I wasn't able to get her into the store in time (those Tarte palettes sold out like hotcakes), and by the time I brought her to the store to purchase the set, it was sold-out on the website as well as store-wide. She ended up purchasing a Tarte limited edition eye-shadow palette, and I purchased the same palette as well.
The year before I bought the Tarte palette, I had purchased the big Sephora holiday palette. I reember really disliking the palette because the shadows were powdery and not very pigmented. So when I found the Tarte palette, I thought that I had hit gold.... the shadows were very pigmented in comparison, and the presentation was really glam/fun and loaded with other goodies. The first layer was full-sized shimmery eye shadows. The second tier was matte shadows. The third tier was a generous lip palette, and the last pull-out tray was filled with gorgeous shades of blush, a very generous sized highlighter and bronzer.
Then my year of makeup-addiction really hit. In fact, I don't think I've bought any clothes, other than those that I absolutely needed, this past year. Any extra funds I have had this year has been allocated to makeup. I also sold several couture handbags to further fund this new-found obsession. Sometime in the summer, I discovered you-tube, and a light-bulb went off in my head at last. I finally begann to realize those subtler differences in makeup brands/products that take them from pretty good to truly professional quality.
A great makeup artist can (in my opinion) take any product and make it work to create a gorgeous look. However, the more exposure one has to products, the more one begins to have preferences for silkier textures, ease of blending, pigmentation, and all the qualities that make a product fabulous rather than just-good, or even, pretty-darn-good.
My Tarte holiday palette remains mostly unused. Though I initially loved the colors and pigmentation, I discovered that the colors have a tendency to blend away. Meaning, rather than holding their pigmentation, that, even with a good primer, multiple colors tend to become muddy when blended rather than maintaining the quality of pigmentation and brightness that one wants when creating a multi-dimensional look.
This year, there's a new Tarte palette, and likely this palette will sell out as well as last year's. The quality of the products is good - and if you are a person who only wants to buy natural products, then Tarte is a great product for you. However, if you want to use more than 2 colors on your eyes without losing the distinctiveness of each color and texture, I would recommend some different palettes.
The palettes that have consistently blown me away with - not only their quality - but their color choices, are the Kat Von D palettes. I managed to grab 4 of these when they were on sale last month, and I was so glad that I did. Each palette contains 8 shadows, which is a decent number of shadows for the price ($35.00). But the best thing about these colors is that they are chosen to complement each other. So in each palette, I might choose to use just a few colors, or I might choose to use 7 out of 8 of the colors - and not only do they look wonderful together, they maintain their distinctive qualities and over/under-tones even when blended out. The only thing that I personally found lacking in each palette (not a big deal, as a single purchase of a color such as Nyx's 'highlight' makes up for this) is that there are no matte highlight tones. Since most of the colors are at least satin - if not shimmery or even outright glittery, a good matte highlight is a necessity in my viewpoint.
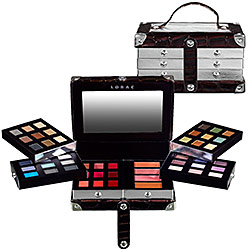
Another palette that I am tentatively liking this year is the Lorac train case (pictured at top left). This palette is terribly constructed - but as my focus is much more centered on the quality of the product, I don't really mind as long as the product delivers. There are two eyeshadow tiers with 18 colors on each tier. One tier has warm-toned colors, and the second tier has cool-toned colors. The bottom tier has a few blushes and a bronzer as well as a collection of 9 lip colors. I am liking the velvety texture of the eyeshadows, as well as the pigmentation on most of them (there are always some that aren't going to be that great). However, in a recent effort to create a more natural look, influenced by Robert Jones' book: "Makeup Makeovers," I discovered that I was still going back to my Kat Von D palettte to use her bright, warm luminescent color 'tequila' over the two similar-looking tones available in the Lorac palette. Since having a luminscent color like this is a staple in any makeup afficionado's collection, it re-affirms my conviction in the quality of the Kat Von D palettes. However, I'll keep playing with the Lorac palette - and I'll get back to you with more on that later on.
One thing that I have learned, unquestionably, in the last year - is that the eyeshadow palette NOT to be missed, EVER, are palettes by Urban Decay. The quality, texture, pigmentation... every possible thing that one is looking for in an eyeshadow - IS found in Urban Decay palettes. I missed out on the Naked palette this year because I was short on funds when they were still available. Now, they're being hawked on ebay for over twice what the original purchase-price was. I am also sad that I didn't grab the Alice-in-Wonderland palette that was their Book-of-shadows equivalent last year. Not only do I love the quirky presentation (although in truth I would still have de-potted the shadows for convenience), the bright colors were truly gorgeous - some of them made just for that quirky palette. This year, I grabbed the Book of Shadows 3 as soon as it popped its colorful head up on Sephora. The colors are mostly more muted than the bright colors I tend to love, but they are still gorgeous, and the quality is still top-notch.
I wish that MAC would come out with some comparable palettes. Their collections are gorgeous, but definitely more pricey. I think I see an upcoming trend of more purchases made at the MAC store for 2011 (conveniently located right next door to Sephora at my local mall), and at some point, I would also love to purchase a Makeup Forever palette in those gorgeous hues that they are known for. However, a Makeup Forever 10-palette runs about 200, while a 15-palette MAC palette runs at 179.00... not a piffling spending habit for the gourmet makeup lover. There are less expensive alternatives (which I will get into in the next blog post) but at some point, I think every makeup lover has to add some MAC and Makeup Forever eyeshadows to their collection to have the full-experience. Happy Holidays - may your holiday season be filled with those gleeful chortles reminiscent of childhood-delights... at your favorite makeup counter/store!
Monday, September 13, 2010
MAC - I finally see the light!

I had no idea what I was in for this year. I have always loved makeup, but only recently have begun to unravel the world of everyday makeup (in contrast to the costume makeup that I was used to doing). There is a Huge(!) world of 'everyday' makeup out there! I remember buying my first purchases from Sephora several years ago, before they had any Sephora stores in Colorado (no sales tax back then in online purchases!). I believe my first purchase was the makeup forever liquid liners (still miss those, as they were such great quality and easy to use). I bought it because I was performing, and was looking for eyeliner that wouldn't melt on stage.
From that point, I would find items randomly as I shopped online. I never really knew the distinct differences between all the different brands and products (still figuring that out), and really, that's what this post is about.
In the mall by my home, there is now a MAC store one store down from the Sephora store. I have shopped at Sephora for years, now, ( I had heard about MAC from other people, of course, but Sephora has such a huge variety that I never felt the need to stray). Even after these past couple of months of intense makeup scrutiny (and countless hours watching youtube tutorials - my first view occurring sometime early in July), I still hadn't stopped by the MAC store. Before they had a MAC store near me, I used to order lipglasses from MAC online (a random gift from a friend got me hooked on those). However, I realized after about a year of using them that they were severely drying out my lips in this arid Colorado weather, so I still have a big stack of lipglasses that are probably going in the trash soon.
But the real point is that, while I had looked at MAC's online store at several products out of curiosity and interest, the only MAC eyeshadow that I own was part of that little gift set I received along with the lipglass - and the pink shadow in the gift set was really not that impressive. So, considering that I am on a tight budget, it is really no wonder that I invested in a lot of Nyx products this year, as well as e.l.f., another new discovery for me.
However, I have been wanting to stop into the MAC store to purchase the brush cleaner. After watching Tiffany D's tutorial on cleaning brushes, the MAC brush cleaner seemed amazing, especially in contrast to the different brush cleaners that I have tried (mostly Sephora, and then the e.l.f. brush cleaner). So it's been on my 'to do' list for quite a while now.
Today was the first time in quite a while where I had the energy to brave the mall in search of the MAC brush cleanser. I picked up the cleanser, and while I was there, of course I wanted to try out, touch, examine the products that I had heard so much about on youtube. I didn't have time to test out all the products, but I did open up the eyeshadow quads from the new collection, and swatch those colors on the back of my hand. At that moment, I finally understood why so many makeup gurus use MAC primarily.
There is a HUGE difference in quality - especially as I just had been using a generic 28 warm palette (which I particularly don't care that much for anyway). I still love a lot of my other products, including both 'higher' end and 'lower' end products - but in the bigger picture, there truly is a noticeable difference in texture, pigmentation, diversity, and overall quality. I didn't buy any MAC shadows (I did stop in at Sephora as I knew that the Kat Von D palettes are on sale for 24 dollars right now - great deal - and these palettes are comparable to my Urban Decay palettes), but the quality of the MAC shadows made an indelible impression on me.
The point is this: if you are, like me, a makeup lover who is looking to take your skills from maybe, 'naturally talented' to 'actually skilled,' you might want to take this into consideration. There are several youtube gurus who believe that the MAC shadows are comparable to certain drug store brands - and while this may be true for certain colors (I've noticed that certain pigments seem to be of a nicer quality across the board - it makes me think that perhaps the material to make those colors is perhaps more accessible), I now understand why some gurus do insist that MAC products really are the industry standard for professional artists.
So if you haven't actually tried several of the MAC shadows that are frequently used in tutorials, I would suggest that you actually go to a MAC store near you (if there is one) and try them out for yourself. A couple of gurus specifically really made me think that MAC shadows were not that much better than other brands - and these are very respected, highly subscribed gurus. Based on their reviews, I did not realize the quality that I was missing out on. I am not saying that MAC has the best quality in every regard - however, going to the store and trying some of the products have changed my entire understanding/view of the hierarchy of quality in products.
I think, of all the gurus, MissChievous probably explains things in a way that makes the most sense to me, now that I have tried the MAC products. For instance, she says that the Ben Nye grande lumiere palette is comparable to MAC in regards to quality - and having bought that palette, I would concur. So I am not saying that one has to pay premium prices in order to get premium quality - however, I would suggest to any other individuals who have relied primarily on youtube reviews, as I had done, to actually test products out for yourself. After all, people have different ideas of quality and different needs from different products. But then, I guess that is just part of the learning process. :)
Subscribe to:
Posts (Atom)